Get Help With Windows Media Player in Windows 10 (Best Guide)
Having trouble with using a windows media player? This post offers a helpful guide on how you can get help with windows media player in windows 10.
You are going to learn the various ways to find my windows media player, install/uninstall windows media player, learn how to use the media player and various ways to find help etc.
You can expand the table of the content menu below to see the various topics covered on how to get help with windows media player in windows 10.
Windows Media Player Help Guide
Windows Media Player is a media player and media library application developed by Microsoft that is used for playing audio, video and viewing images on personal computers running the Microsoft Windows operating system, as well as on Pocket PC and Windows Mobile-based devices. Editing metadata of audio files is a built-in feature of the application. It is also possible to use WMP to rip music from CDs or burn music to CDs.
If you wish to learn how to burn music to CDs using the Window Media Player then keep reading till the end or you can use our table of content to navigate to that area.
Find My Windows Media Player
In this section, you will learn the possible ways how you can find and open your windows media player. So whichever method is convenient for you let us know in the comments section.
Using The Start Menu
- Click the Start Menu (the windows logo icon) located at the bottom left corner
- Scroll through the pop-up start menu until you reach W, locate and click on the Windows Media Player. If you do not see the Windows Media Player, please click on Windows Accessories and expand it. There you’ll find the Windows Media Player.

Using The Search Bar
Simply type Media Player using the windows search box on the Windows Task Bar and click on Windows Media Player

Using The Run Window
- To access the Run Window, simply right-click on the Start Menu and click on Run or use the windows search box to search “Run”
- Type wmplayer.exe in the Run search box and click OK once Run opens.
How To Setup The Windows Media Player When Launched For The Very First Time
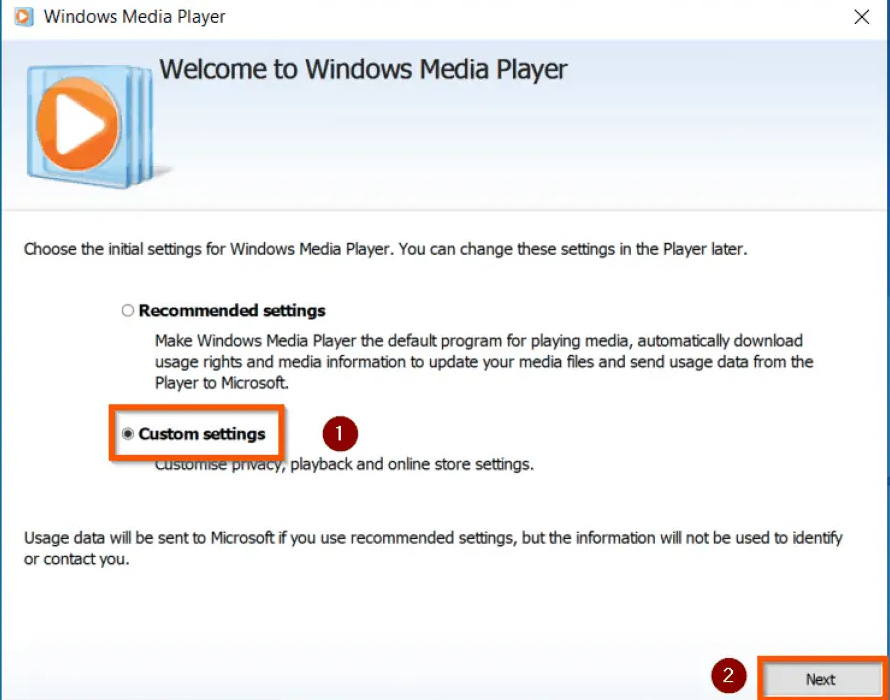
Whenever you launch the Windows Media Player for the very first time, you get a pop-up menu with two setup options
- Recommended Settings
- Custom Settings
Steps
- Click on Custom Settings and click on next as shown below
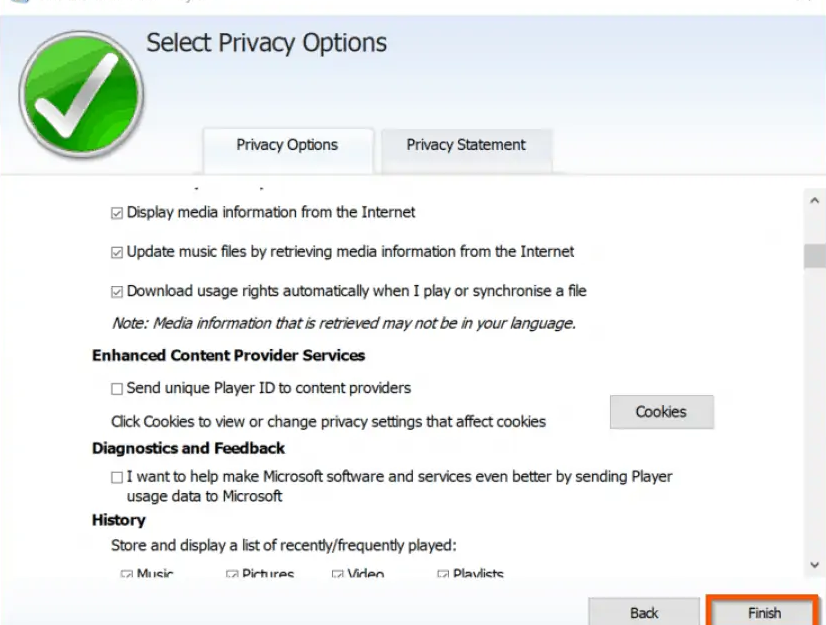
- You can uncheck/check any function using the Checkboxes. Click on Finish if you are satisfied with the set
How To Install Windows Media Player
Note that this step is effective once you do not have the Windows Media Player on your computer. But if you have and it has problems and you want to reinstall, then we have a step-by-step guide as you read through.
In order to install the Windows Media Player on your computer, follow the steps below.
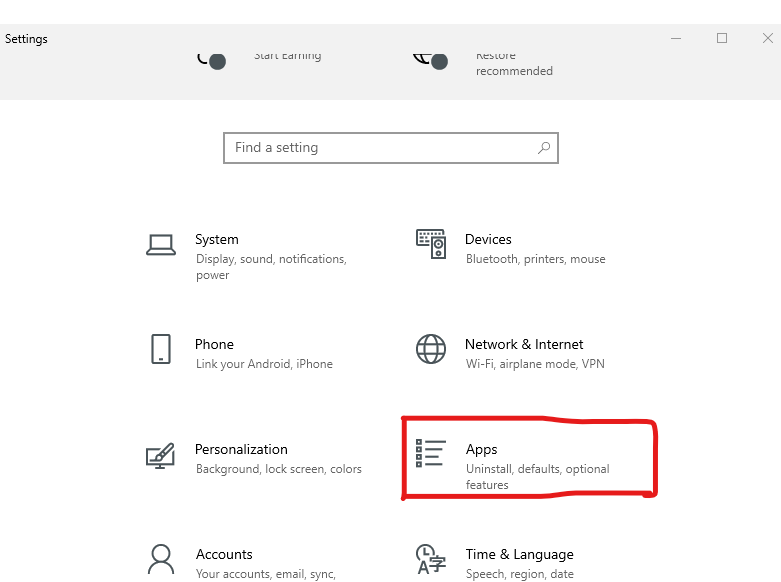
- Open Settings (right-click on the start menu and click on settings), Click on the Apps icon as shown below.
- Click on the Optional Features found under the Apps & Features tab as shown below
- Click on Add a Feature and click on Windows Media Player after which you click Install
Note: If you wish to uninstall the Windows Media Player, follow the steps above and click on uninstall (Screenshot below) but note that you’ll not click again on add feature since you already have the Media Player installed. Simply Scroll through the Installed Features to select it.
How To Use Windows Media Player (Get Help With Windows Media Player in Windows 10)
To Play Audio/Videos
Windows Media Player is a great way to play audio/video files on your computer. Here are some tips on how to play music in Windows Media Player:
- Open Windows Media Player and select the audio/video you want to play.
- Click the Library button and select the audio/video file you wish to play or right-click on the audio/video file and open it with Windows Media Player Simply click and hold on the file and drag and drop on the Windows Media Players Window.
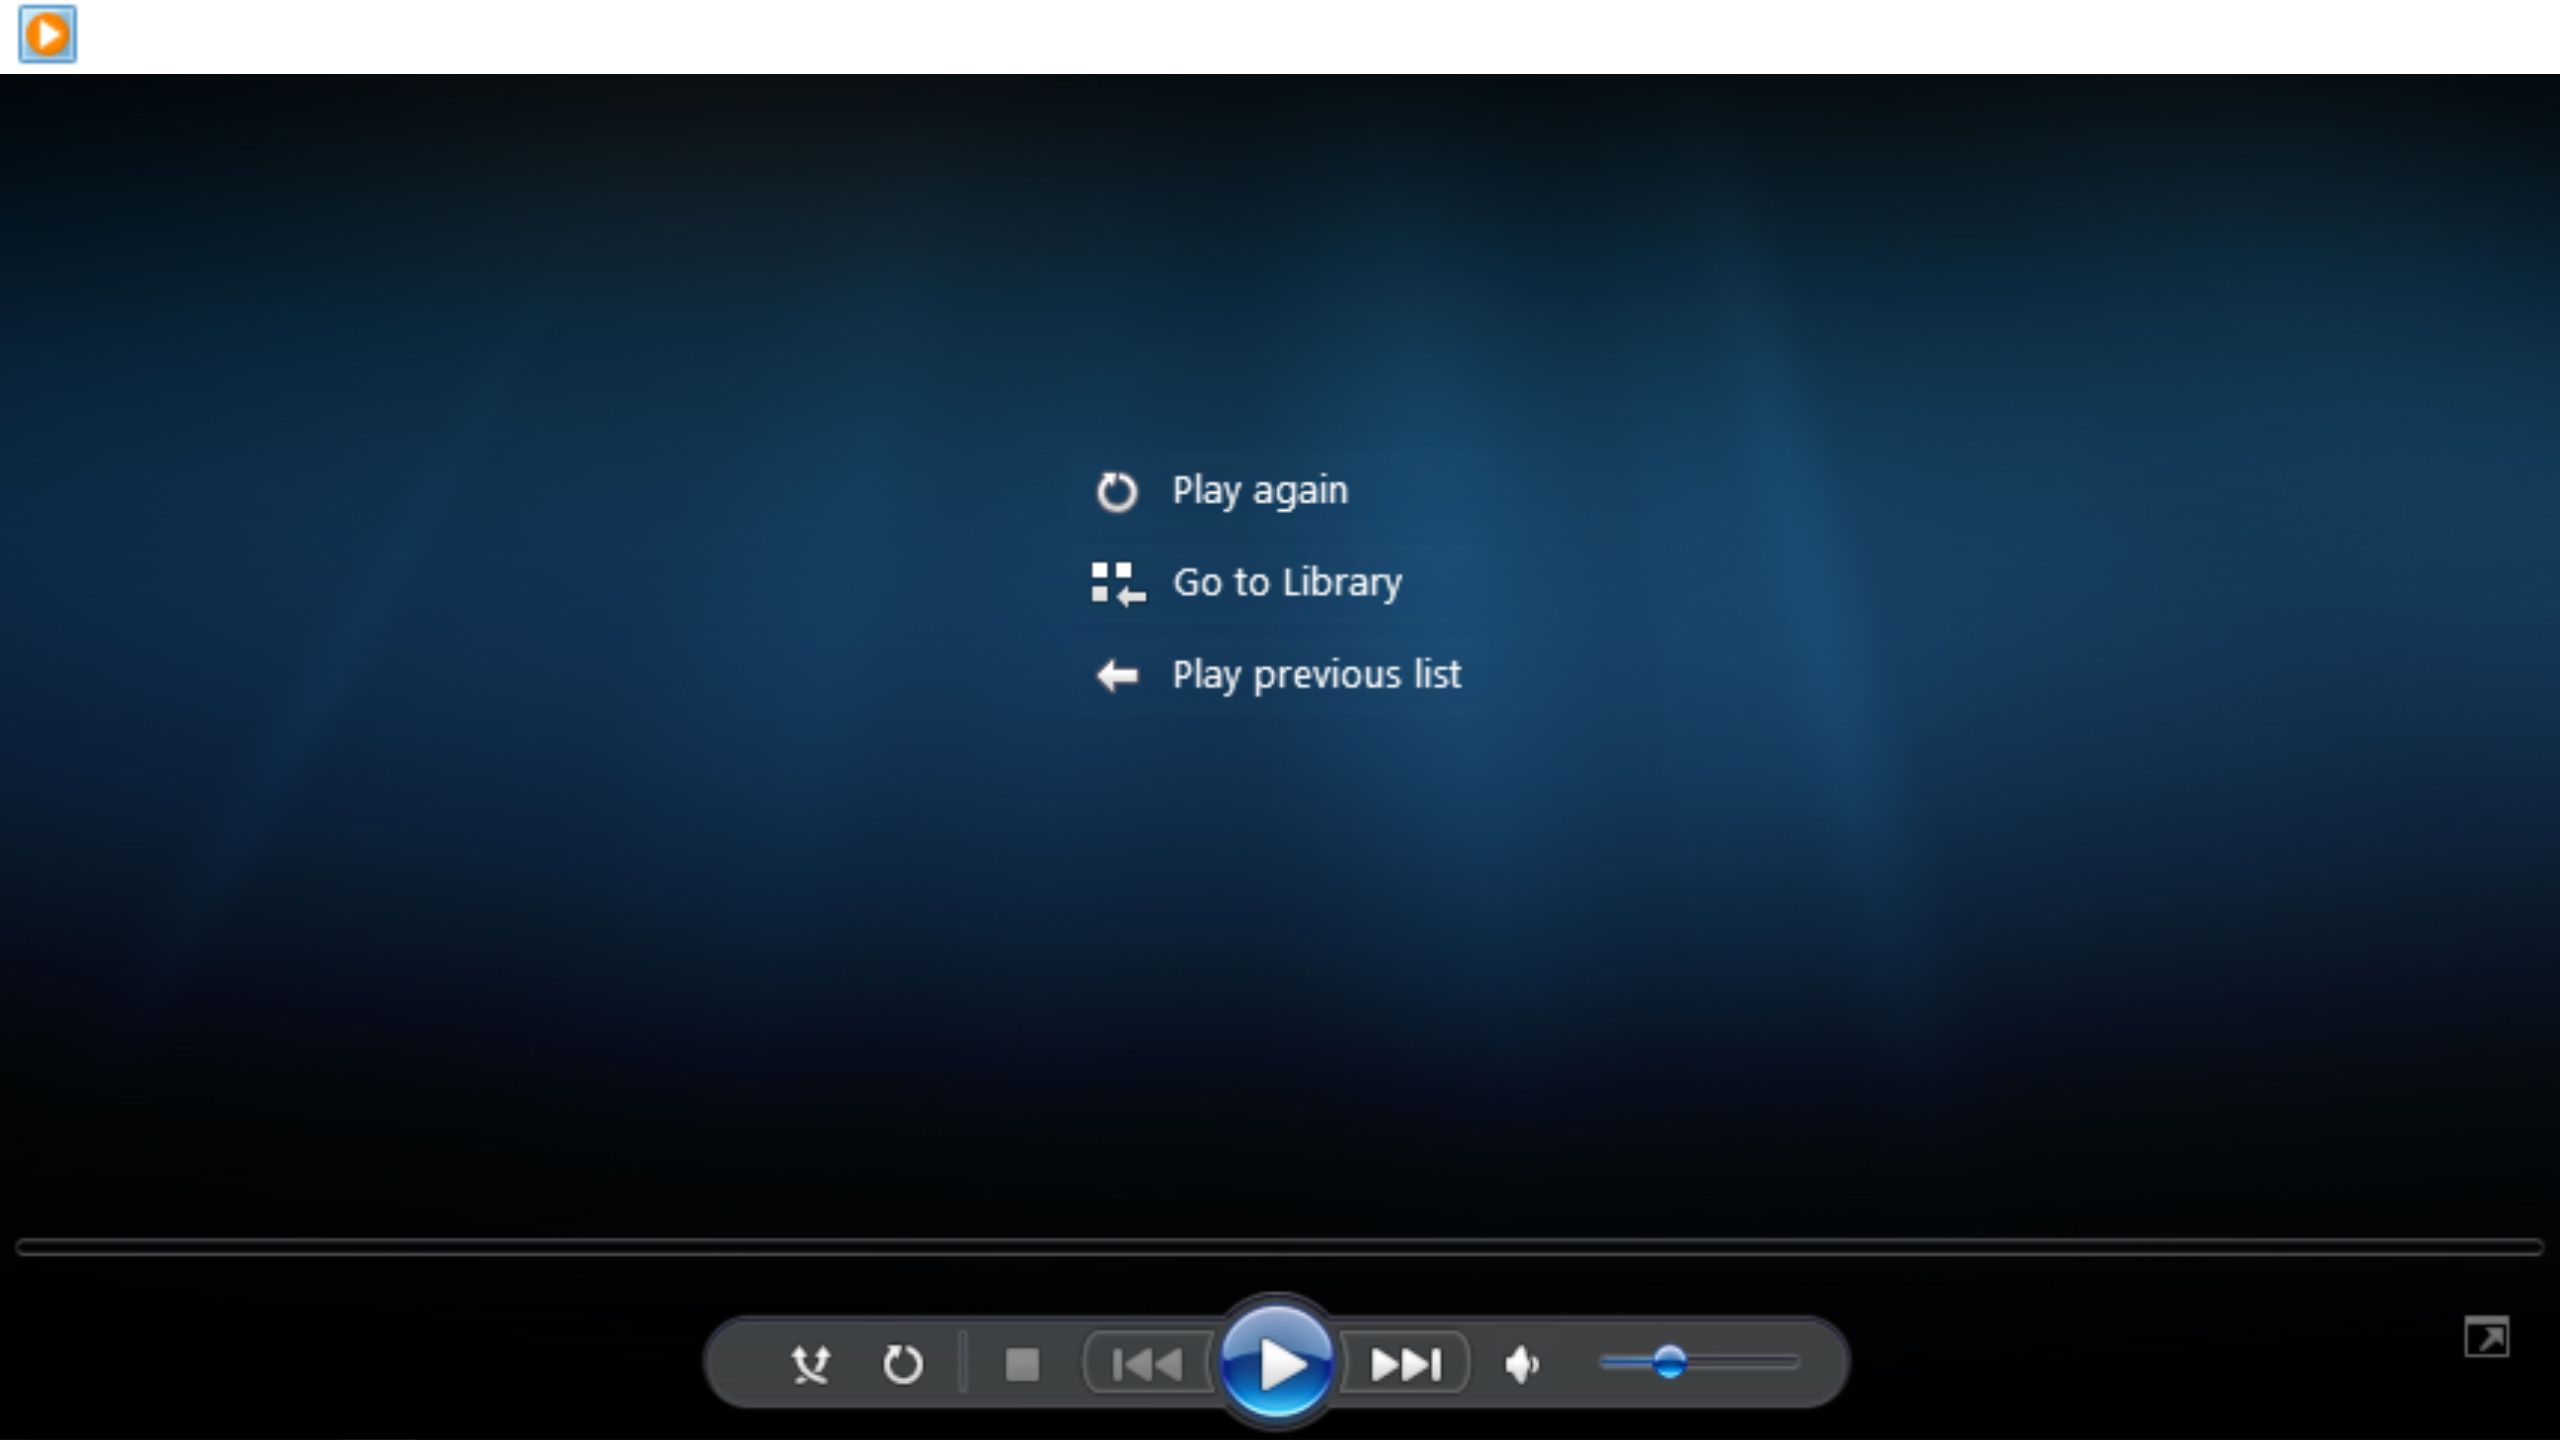
- Click the Play button if it doesn’t start playing automatically.
- To pause the music, click the Pause button.
- To skip to the next song, click the Next button.
- To stop the music, click the Stop button.
To Play a DVD or CD
- Insert the disc you want to play into the CD or DVD Drive
- Usually, the disc will begin playing on its own. Open Windows Media Player and choose the disc name in the navigation pane of the Player Library if it doesn’t play or if you want to play a disc that is already inserted.
To Copy or Burn a CD
If you want to burn a CD in Windows Media Player, follow these steps:
- Insert a virgin disc in the CD Drive
- Open Windows Media Player.
- Click the File tab.
- Select Burn Disc.
- Select the appropriate media and format.
- Click Burn.
- Wait until the burn is complete.
Get Help With Windows Media Player in Windows 10
Here are some basic functionalities on how you can get help with a windows media player in windows. A complete step-by-step guide.
How To Enable Media Player Help Menu Missing
If you are finding a hard time looking for the Menu bar on Windows Media Player the following steps will help reveal it.
- Right-click any way at the top where the library bar is located.
- Click on Show Menu Bar, or simply press Ctrl+M to show up the Menu Bar. (See screenshot below)
How To Use The Windows Media Player Help File
In this section, we are going to walk you through briefly how to use the 5 Menu options (File, View, Play, Tools and Help)
Windows Media Player “File” Menu
The moment you click on the “File” menu, you realise it has other options such as; Open, Open URL…, Close, Create Playlist, Create Auto Playlist, Manage Libraries, Properties and Exit.
- Open: In order to play or populate any audio or video file in your player, click on the open menu and navigate to the area where your files are saved. Select a file and click on open.
Immediately you click on open, the music starts playing, you can use the control buttons at the bottom of the player to pause, stop, next, shuffle between songs and increase/reduce the volume.
- Open URL: This area is good for people who don’t have enough space on their computers or don’t just want to download audio/video files onto their computers. What you need to do is, simply click on Open URL > Paste the audio link > Click on Ok so the media player can start streaming.
- Save As and Close
The save as and close becomes active when you are playing an audio/video file from a link online. To save the file you are streaming, Click on “Save As” and choose the location where you wish to save the file. The “Close” button helps close whatever file you are streaming online.
- Create a Playlist and Create Auto Playlist
It is pretty easy to create a playlist using the Create Playlist button and after you create it, you can rename it depending on the file category you are playing. You can explore it by testing it out and let us know in the comments section your experience on that.
With the Create Auto Playlist, it isn’t as straightforward as compared to the Create Playlist section. The Auto Playlist helps arrange your audio/video files in different or the same sections if they meet the same criteria. e.g RnB music won’t be saved in a Raggae playlist and vice versa. You can play around with these tools with ease since they are not complicated to use.
- Manage Libraries
This is the last sub-menu I will throw light on before we head over to the View Menu. And please try to explore the other sub-menus under the File Menu and let us know what cool feature wowed you.
The Manage Libraries sub-menu has other four sub-menus (Music, Videos, Pictures, Recorded TV) when you hover over it. These menus take you to the Windows Media Player’s default save location. You can also include other folders in this default library but note that their original location doesn’t change.
Windows Media Player “View” Menu
The View menu isn’t as complicated as the File menu hence offers some cool features for you to explore. Without wasting much time let’s dive in.
In order for you to explore this section, simply hover your mouse pointer over the “View” Menu and explore the sub-menu features (Library, Skin, Now Playing, Skin Chooser, Show Menu Bar, Plug-ins)
Just a quick reminder: While the File menu focuses on configuring the different functionalities of the Windows Media Player, the View menu controls the appearance of Windows Media Player.
- Library:
- This is the default view for the windows media player. The first column (left pane) displays the Library (Music, Video, Picture, Recorded TV, Other Media and Playlist).
- The Middle Pane displays the media titles with all details about the file.
- And on the right pane, you have three tabs (Play > Burn > Sync)
- The play tab simply displays the list of recent files currently being played.
- The Burn tab offers the flexibility to burn what audio/video file you wish to burn on a CD. (You can navigate above to see how burning is done on a windows media player)
- And lastly, the Sync tab offers great flexibility to access your phone when connected to the computer.
The second aspect we are going to talk about under the View menu is the Skin
- Skin: This offers a tiny black window (default) which displays information about the file you are currently playing and also gives you the flexibility to pause, play, stop, next, previous, repeat or shuffle between the files currently in your playlist.
To return to the Library mode simply press Ctrl + 1 keys on your keyboard simultaneously or Click the View menu and select Library.
Moving on after the Skin menu is the Now Playing menu
- Now Playing: To access the Now Playing window, simply click on the View tab and select Now Playing. (Screenshot below shows you how its viewed)
In order to return to the Library view, simply hover over the icon and select the Switch to Library button (Screenshot below). You can also access the control areas immediately after you hover over the Now Playing Window.
- Skin Chooser: This section displays the available Windows Media Player Skins to choose from. To access this section, simply click on View > Skin Chooser > then select Corporate or Revert and click on Apply Skin (Screenshot below)
- Refresh: The refresh button simply helps boost the functionality of your Windows Media Player
- Video Size: This section offers you the possibility to change the size of your Media Player Window to best suit your view.
Our next menu tab is Play which offers some cool control features on how to manipulate your audio/video file list. Just to refresh your memory, this is the third menu after the File and View menu already discussed above.
Windows Media Player “Play” Menu
As rightly mentioned above, the Windows Media Player “Play” menu plays an important role when it concerns the functionality of the Media Player. We all know the essence of why we need a media player which helps us to play our audio/video files downloaded from the internet.
You will find features like Play/Pause, Stop, Play Speed, Previous, Next, Rewind, Fast Forward, Shuffle, Repeat, Audio and Language Tracks, Lyrics, Captions and Subtitles, Volume and more.
Go ahead and test any feature you aren’t familiar with and let us know your experience in the comments section of this article.
Windows Media Player “Tools” Menu
The Tools menu offers some features that carry out specific tasks hence offering a great user experience.
On the Tools menu, you will find; Download (Visualisations, Plugins, Skins), Apply media information changes, Plug-ins, Options and Advance
Looking at the Download button we have Visualisations, Plugins and Skins and if are not satisfied with what you currently have in terms of visuals, plugins and skins, you can download more by clicking on either of the buttons. Note that the moment you click on any of these features, it uses your default browser to open the web page of what you wish to download.
In order to change your Windows Media Player Settings, the Options sub-menu is needed. Explore it and see what additional settings you can add to enhance your Media Player experience.
And lastly, the Advance Menu gives you the option to Restore Media Library and Restore Deleted Library Items.
Windows Media Player “Help” Menu
The Help menu tab is the last menu on the menu list and it has features like; Windows Media Player Help, Windows Media Player Online, Check for Updates…, Privacy Statement Online, and About Windows Media Player.
You can check out these features and see what it has in store for you.
How To Reinstall Windows Media Player
- Using the search box on the desktop taskbar, type features, and select Turn Windows Features On or Off (Screenshot below)
- Scroll down to Media Features and click on the plus (+) icon to expand it, Then uncheck the Windows Media Player check box, and click Ok. (Screenshot demonstrating how it’s done is below)
- Restart your computer so windows player can be uninstalled
- Repeat Step 1.
- Scroll down to Media Features and click on the plus (+) icon to expand it, Then check the Windows Media Player check box, and click Ok.
- Restart your computer so windows player can be reinstalled
If this was helpful please let us know your valuable view and also share to help promote our work.
How To Download/Install Third-Party Media Player
We are going to use VLC Media Player as an example since it’s an amazing Media Player and supports more file types. I’m certain the reason why you are reading this is that you tried playing a video file using the Windows Media Player and it didn’t support the file type.
Don’t worry any longer the VLC player will solve your problem in no time. Please let us know in the comments section if the VLC player did play the file type.
How To Download VLC
- Simply visit the VLC Website
- Click Download VLC. It’s an orange button located towards the right side of the page. as shown in the screenshot above.
- Immediately you click on download, wait for a few seconds and your download will start automatically. If it doesn’t start automatically, click where you are asked to click on the VLC download page.
- In some cases, you may be prompted to select you folder to which you wish to save your download if not then visit the windows download tab and check it there.
How To Install VLC
- Go to where your VLC set-up is saved (windows default download location)
- Double-click the downloaded set-up file and follow the following instructions (screenshot below)


- At this stage, wait for a few minutes for the VLC media player to install.
- After it has been installed, you can choose to check the Run VLC media player box immediately or open the installed icon on the desktop to launch it. (Screenshot below)

How To Add Subtitles To Windows Media Player
If you’re watching a foreign film or one with poor audio, subtitles can be a lifesaver. Here’s how to add subtitles to a movie or TV series in Windows Media Player.
- Right-click the video file, and select Properties.
- Select the Languages tab.
- Click the Add button.
- In the Add Language dialogue box, select the language for the subtitles from the drop-down menu.
- Click the Browse button.
- In the Subtitles dialogue box, select the subtitle file you want to use.
- Click the Open button.
- Click the OK button.
Your subtitles should now appear in Windows Media Player.
Get more detailed information on how to add subtitles to Windows Media Player
Windows Media Player Not Working Solved
If you’re having trouble with Windows Media Player, there are a few things you can do to try and fix the issue.
First, make sure that your computer is up to date. Windows Media Player should work fine on most modern computers, but if your computer is running an older version of Windows, it might not be compatible. To check for updates, open the Start menu and click on “Control Panel.” From here, open “System and Security” and then click on “Windows Update.”
If there are any updates available, install them and then try opening Windows Media Player again.
If that doesn’t work, try resetting Windows Media Player. To do this, open the Start menu and type “cmd” into the search box. Right-click on “Command Prompt” and select “Run as Administrator.”
At the command prompt, type “regsvr32 wmploc.dll” and press Enter. This will reset Windows Media Player and hopefully fix the problem.
File Types Support By Windows Media Player
Below is a list of file types supported by Windows Media Player. Check to see which file type it supports so you know the exact audio/video file type when downloading.
- Audio for Windows (.wav)
- Audio Interchange File Format (.aif, .aifc, .aiff)
- Audio Visual Interleave (.avi)
- CD Audio Track (.cda)
- Free Lossless Audio Codec (.flac)
- Indeo Video Technology (.ivf)
- Microsoft Digital Video Recording (.dvr-ms)
- Moving Pictures Experts Group (.mpg, .mpeg, .m1v, .mp2, .mp3, .mpa, .mpe, .m3u)
- MP4 Audio file (.m4a)
- MP4 Video file (.mp4, .m4v, .mp4v, .3g2, .3gp2, .3gp, .3gpp)
- MPEG-2 TS Video file (.m2ts)
- Musical Instrument Digital Interface (.mid, .midi, .rmi)
- QuickTime Movie file (.mov)
- Sun Microsystems and NeXT (.au, .snd)
- Windows audio file (.aac, .adt, .adts)
- Windows Media Download Package (.wmd)
- Windows Media formats (.asf, .wma, .wmv, .wm)
- Windows Media Metafiles (.asx, .wax, .wvx, .wmx, wpl)
- Windows Media Player Skins (.wmz, .wms)
Windows Media Player Shortcuts
Here you will find the global Windows Media Player Shortcuts or hotkeys which help you save time.
- Ctrl+Alt+Home – Play / Pause
- Ctrl+Alt+Right – Next track
- Ctrl+Alt+Left – Previous track
- Ctrl+Alt+Up Arrow Key – Volume Up
- Ctrl+Alt+Down Arrow Key – Volume Down
- Ctrl+Alt+F – Fast Forward
- Ctrl+Alt+B – Fast Backward
- Ctrl+Alt+[1-5] – Rate 1-5 stars
| S/N | Windows Media Player Keyboard Shortcuts | Keyboard Shortcuts Details |
|---|---|---|
| 1 | Ctrl and O keys | OPens the “Open” dialogue box. Also available in the File -> Open menu |
| 2 | Ctrl and U keys | Open the “Open URL” dialogue box. The dialogue box can also be accessed via the File -> Open URL menu |
| 3 | Ctrl and W keys | Stops playing the music or video currently playing |
| 4 | Ctrl and N keys | Create a new playlist. You can also perform this action via the File -> Create playlist menu |
| 5 | Ctrl and 1 keys | Displays Windows Media Player “Library” View – also available via the View -> Library menu |
| 6 | Ctrl and 2 keys | Displays Windows Media Player “Skin” View – also available via the View -> Skin menu |
| 7 | Ctrl and 3 keys | This keyboard shortcut displays Windows Media Player “Now Playing” View – also available via the View -> Now Playing menu |
| 8 | Ctrl and M keys | Displays or removes the Windows Media Player menu bar. You can also access this via View -> Show menu bar menu |
| 9 | Alt and Enter keys | Displays Windows Media Player in Full-screen mode. This option is also available via the View -> Full-screen menu |
| 10 | F5 key | Refreshes Windows Media Player items |
| 11 | Alt and 1 key | Sets the Windows Media Player video size to 50% |
| 12 | Alt and 2 keys | Sets the Windows Media Player video size to 100% |
| 13 | Alt and 3 keys | Sets the Windows Media Player video size to 200% |
| 14 | Ctrl and P keys | Play/Pause. Also available from the Play -> Play/Pause menu. If a music track or video is playing, pressing Ctrl and P keys pauses the track. Pressing the keyboard shortcut resumes play. |
| 15 | Ctrl and S keys | Stops playing a track or video. This option is also available in the Play menu. |
| 16 | Ctrl, Shift and G keys | Controls Play Speed – plays the track Fast. You can also access this via the Play -> Play Speed menu. |
| 17 | Ctrl, Shift and N keys | Controls Play Speed – plays the track Normally. You can also access this via the Play -> Play Speed menu. |
| 18 | Ctrl, Shift and S keys | Controls Play Speed – plays the track Slowly. You can also access this via the Play -> Play Speed menu. |
| 19 | Ctrl and B keys | Plays the Previous track – available in the Play -> Previous menu |
| 20 | Ctrl and F keys | Plays the Next track – available in the Play -> Next menu |
| 21 | Ctrl, Shift and B keys | Rewind. You can also access this from the Play menu |
| 22 | Ctrl, Shift and F keys | Fast forward – also available in the Play menu |
| 23 | Ctrl and H keys | Shuffle – you can also access Shuffle from the Play menu |
| 24 | Ctrl, Shift and C keys | Adjust Lyrics, captions and subtitles settings |
| 25 | F7 key | Mute – also accessible from the Play -> Volume menu |
| 26 | F8 key | Volume Down – also accessible from the Play -> Volume menu |
| 27 | F9 key | Volume Up – also accessible from the Play -> Volume menu |
| 28 | Ctrl and J keys | Eject CD/DVD. You can also eject a CD/CDV by clicking Play -> Eject menu |
| 29 | F1 key | Opens search results for “get help with windows media player in windows 10” on Bing.com |
Conclusion
That is it guys for this article on how to get help with windows media player in windows 10/11. The essence of this post is to help you solve basic problems associated with the Windows Media Player and how to use it efficiently.
The list below is a quick reminder of what we have touched on in this article and if this was helpful, please share to support our growth and also let us know what you think in the comments section. Cheers!!!
- Find My Windows Media Player.
- How To Install Windows Media Player.
- How to use the Windows Media Player.
- How to Enable Media Player Help Menu Missing.
- How to use the Windows Media Player Help File.
- How to reinstall Windows Media Player.
- Downloading and installing a third-party media player.
- Adding/Enabling Subtitles to the windows media player.
- Windows Media Player not Working solved and more…

