

Help With Paint in Windows 10 – Best Paint User Guide For Beginners
How To Use Microsoft Paint For Beginners
Here is a complete windows 10 paint user guide for beginners that offers all the help with paint in windows 10. Become an expert in design for free.
This article on How To Use Microsoft Pain For Beginners is distributed in parts so as to enhance your learning experience by easily navigating through the lesson (using the table of content below) to the area where you need help most.
You will learn…
- The different methods used to Open Paint in Windows.
- The different Paint Features and their functions
- The different methods used to resize the “Paint” canvas
- The different ways how you can work with images(resize, crop, rotate, merge, insert etc) in paint.
- How to draw in paint (Become an expert)
- How you can add and customise Text
- The different shortcuts or hotkeys in Paint so to enhance your working experience and more.
Without wasting much of your time, let’s dive in…
Part 1: Opening The Paint App on Windows 10
Before you learn how to use any software application, you must first off all know how to locate and launch it on a computer. Below are three basic ways how you can open the Microsoft Paint App on Windows 10.
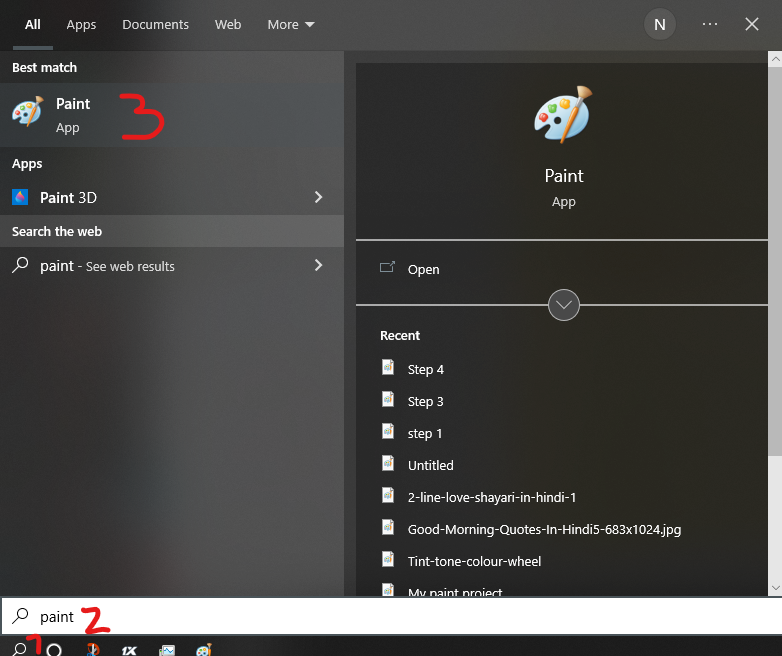
1. Using The Windows Search Box
Steps
- Navigate to the Windows Taskbar and click on the Search Box.
- In the search box, type Paint and click on the Paint App to open (Screenshot below)
2. Using The “Run” Command
Steps
- To open the Run dialogue box, right-click on the start menu and click on Run or use the shortcut Win+R
- Once open, type in “MSPaint” and click on OK or press Enter on your keyboard

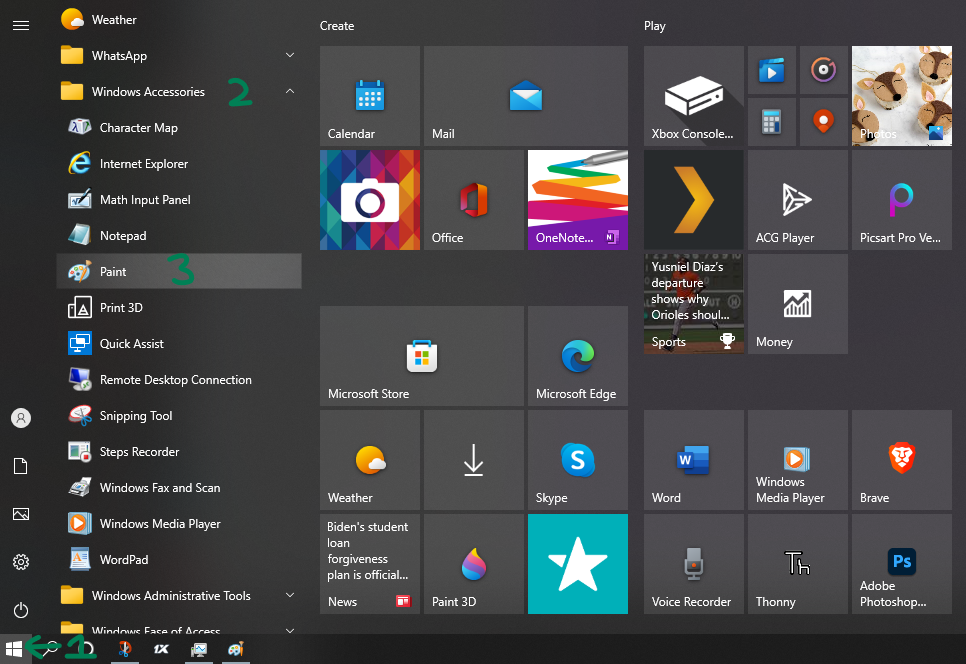
3. Using The Start Menu
Steps
- Navigate to the Windows Logo Start button at the bottom left corner of your screen.
- Click the Logo button and scroll down to Windows Accessories
- Click the Drop Down Icon and Click on Paint to open the App (Screenshot below)
Part 2: Paint Features and Functions – Help With Paint In Windows 10
If you really wish to be familiar with most of the cool and useful features of Paint, then this section will help you get help with paint in windows 10. So if you are ready, let me walk you through all the Paint Tools
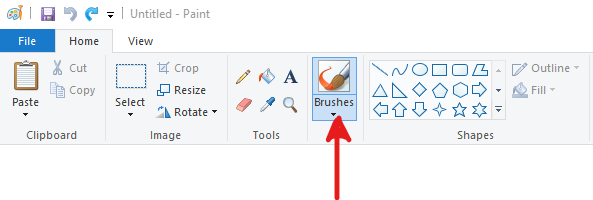
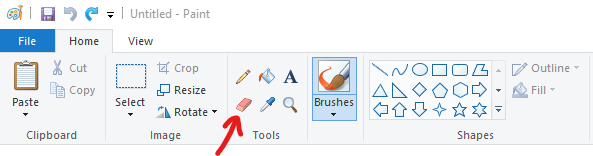
1. The Brushes
When you select the Brushes tab, a Full window containing a number of brushes will appear. Pick a brush that has the color you want to draw with. There are nine different brush types, each with a unique style.
2. The Color Picker Tool
The most practical tool offered by Microsoft Paint in Windows is this one. With the help of this capability, you can select a color from one place and then paste it.
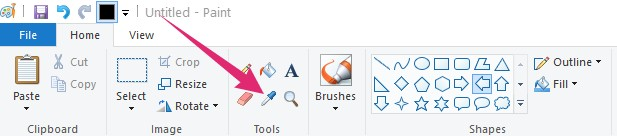
3. The Eraser Tool
Use the eraser to remove anything you wish while drawing. Click on the Size choices next to it to change the size of the eraser.
4. The Fill With Color Tool
The drawing’s colors are added using the Paint tank symbol. To fill the Paint Tank, click the Paint Tank symbol and choose the desired color.
Use the “Fill with Color” tool from the top menu bar to quickly fill a space with a specific color. It resembles a bucket. Choose your preferred “Color 1” and “Color 2” first. Then, click and choose the “Fill with Color” option. Use the left and right clicks to draw using “Color 1” and “Color 2,” respectively.
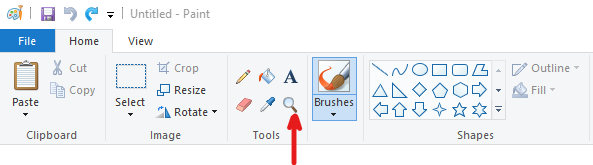
5. The Magnifier Tool
To examine the sharpness of your work and zoom in on any area of your drawing, utilize this tool.
6. The Pencil Tool
Find the Tools option under the Home menu, then click the pencil icon and create the artwork you want.
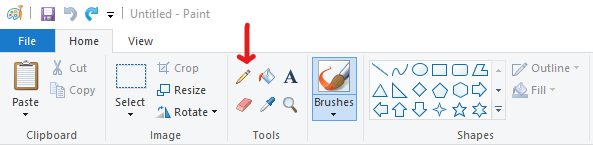
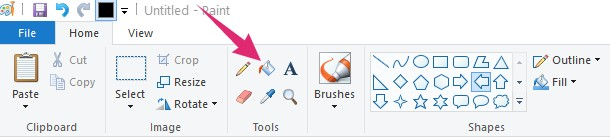
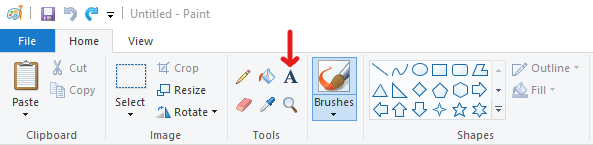
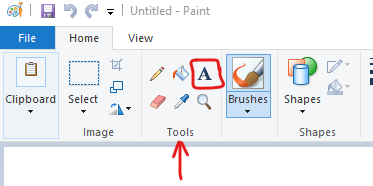
7. The Text Tool
Navigate to the A icon, then select the area where you want to add text. (Screenshot below)
Part 3: Resizing The Paint Canvas – Help With Paint In Windows 10
1. Resizing Paint Canvas
I’m going to share with you three different methods on how you can resize the Paint Canva size.
Method 1 (screenshot demonstration below)
- Open your Paint App (Using the steps we previously talked about above)
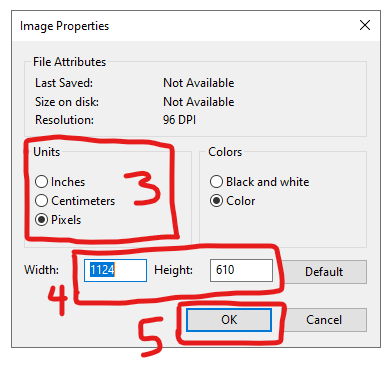
- Navigate to your File Menu and Click
- Move your mouse pointer downwards and click Properties
- On the popup window, you can choose any Unit of your choice and then manually put in your desired dimensions and hit OK.
- Note: if you are not satisfied with the size you manually put, you can always go back and click on default which takes you to the original Paint Canva Size

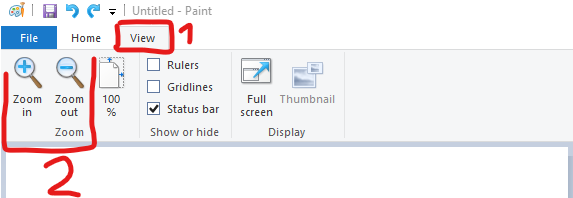
Method 2
- On the View Tab (Navigate and Click on the View Tab) you can use the Zoom in button to increase the canvas size and the Zoom out button to reduce the canvas size.
Method 3
This is one cool method you didn’t believe could exist in Paint
- Use your mouse pointer and hover on the Canva areas where you find a small square (View screenshot below)
- When the pointer changes that’s when you click and drag inwards or outwards.
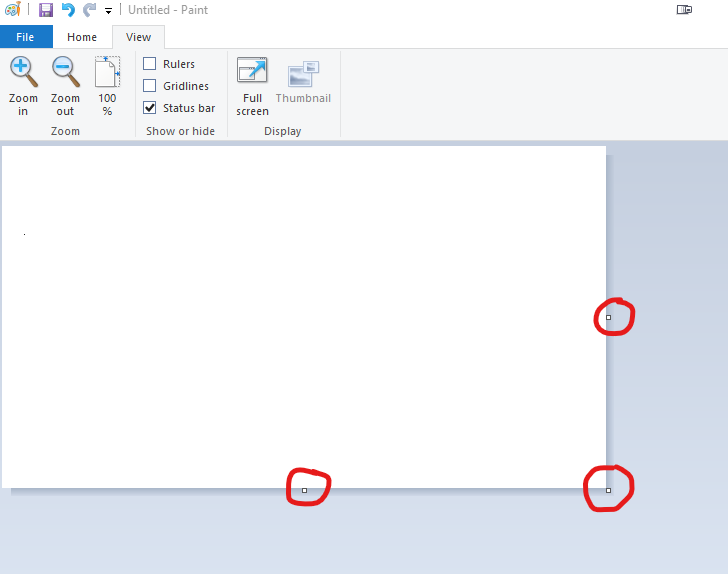

- Note that the tiny square at the bottom can only increase the Canva size downwards and the square at the right (middle) increases the Canva size sidewards whilst the angle square (bottom right corner) increases the Canva size at both ends (Downwards and Sidewards).
Part 4: Working With Images In Paint – Help With Paint In Windows 10
1. How To Insert Image In Paint
In this section, you will learn five cool methods on how you can insert an image in Microsoft Paint Windows. The last method will wow you…excited about it, let’s dive in.
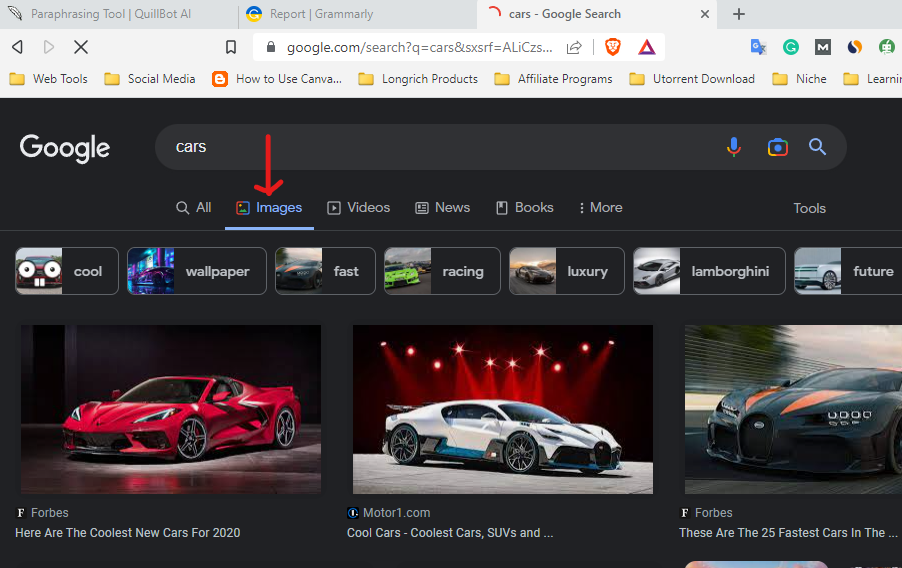
Method 1: Using Websearch
Steps
- Using any internet browser, search for your desired image and on your browser, click on Images to display only images. (View Screenshot below)
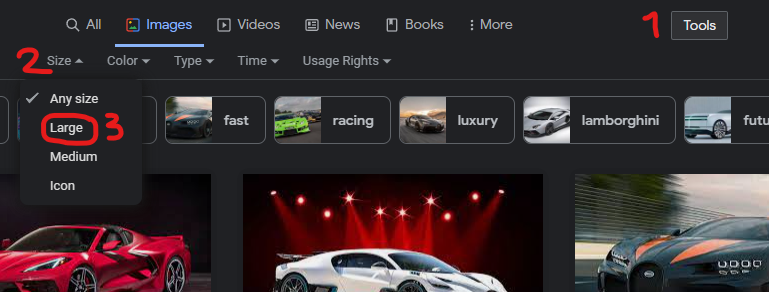
- Navigate to and click on Tools if you are using the Google Chrome Browser, select size and select “Large“. This enables you to acquire quality images.
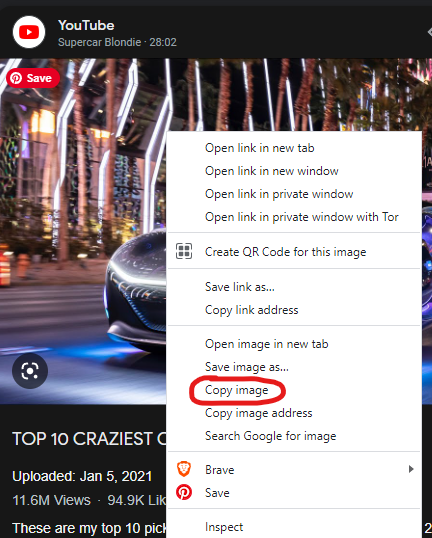
- To open the image, click on it, then Right-click on the image and click Copy Image (View screenshot below)
- Open the Microsoft App using any of the methods above
- Click on the Paint Canvas Area and press Ctrl+V on your keyboard to paste the image.
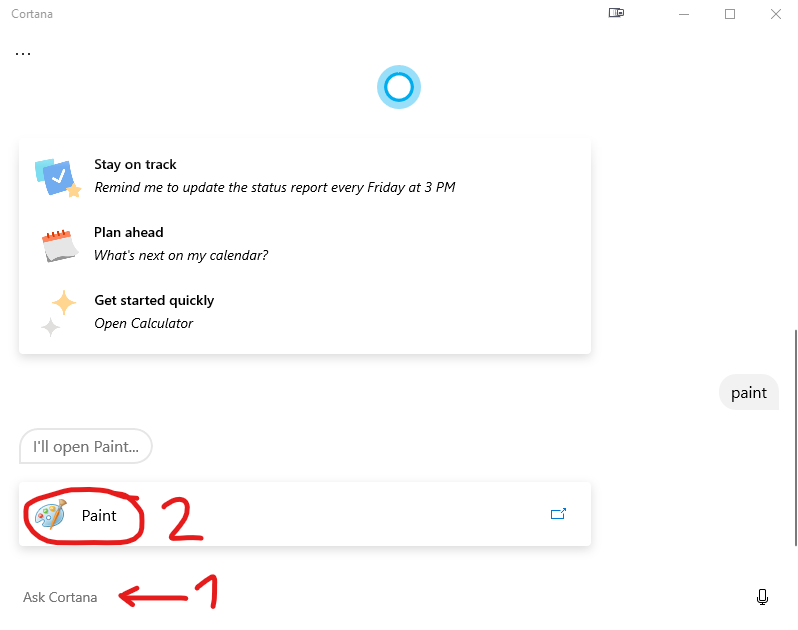
Method 2: Using Cortana
- Top open Cortana, and navigate to Cortana on the Windows Taskbar at the bottom left corner immediately after the search icon.
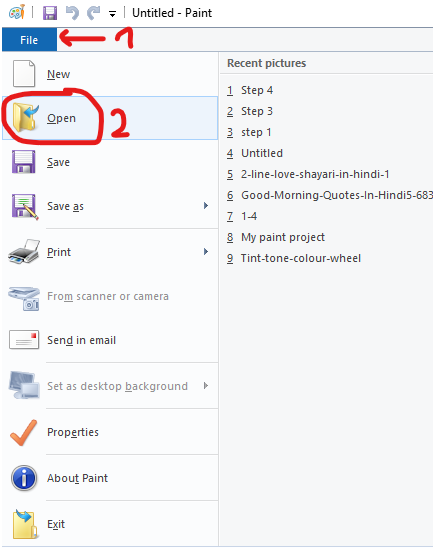
- Once it’s open, Type in Paint and Click on the results to open the Paint App
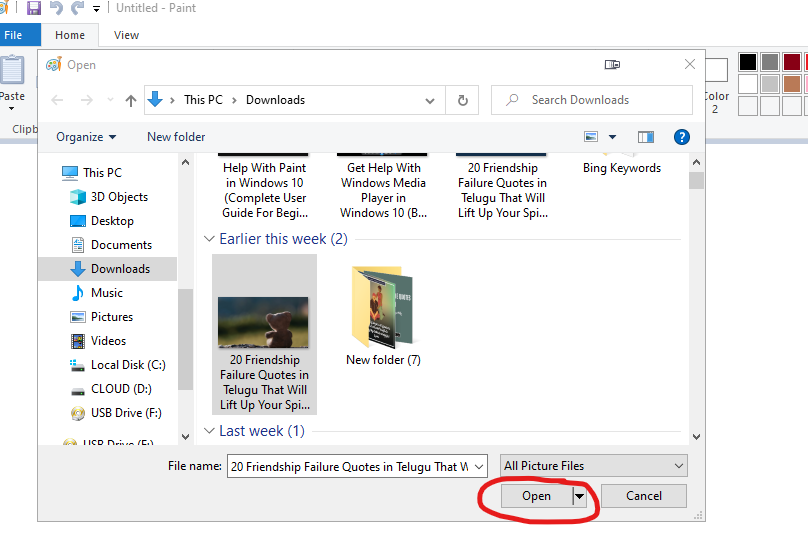
- On the Paint App, click on the File menu and click Open
- The moment you click on open, the Windows File Explorer Window Opens Up. Then Navigate to where your image is saved.
- Select the image and click on Open.
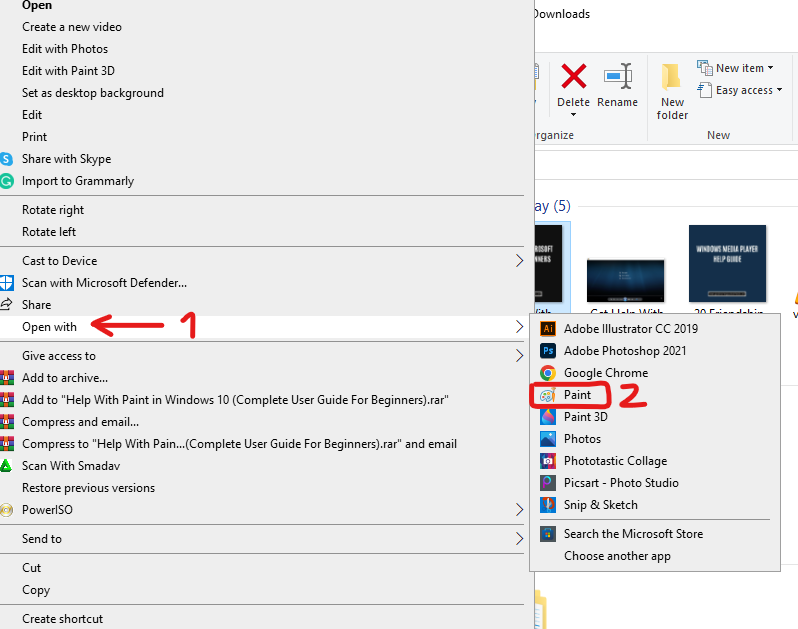
Method 3: Using File Explorer
- To open an image in Paint using Windows File Explorer, simply open File Explorer (Get help with Windows File Explorer)
- Right-click on the image you wish to open in the Paint App Select Open with > Paint (View screenshot below)
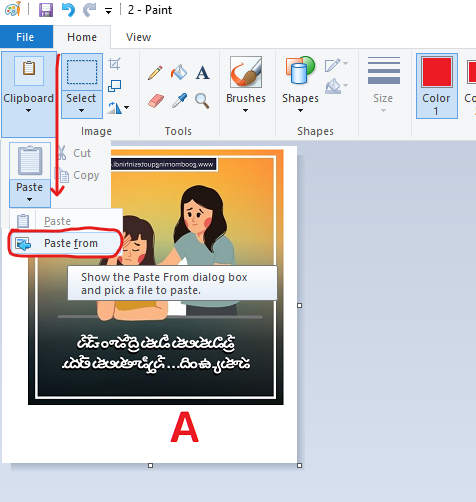
Method 4: Using “Paste From”
This method takes you yet again to the Windows File Explorer for you to choose your desired image. The screenshot below will assist you to locate it.
Method 5: Using “Drag and Drop”
This method is one of the simplest and most effective methods to insert an image in Paint.
- Firstly you need to open your Paint App using any of the methods we used above then…
- Navigate to the area where your images are saved (Open up File Explorer)
- Once you have identified your image, simply click and hold the image, drag it by moving your mouse cursor to the open Paint App Canvas and boom you have your image imported to Paint like magic.
After trying these five methods of inserting an image in MS Paint, which one was your favourite? Let us know in the comments section.
The next thing we will be talking about is resizing, cropping and rotating an image in Paint, if you have always seen that as a challenge then see it no more.
2. How To Resize/Crop/Rotate Images In Microsoft Paint Windows
One of the most common tasks people ask for when using Microsoft Paint is how to resize/crop/rotate images. This is a great question, as I will be sharing with you how to resize/crop/rotate images in Microsoft Paint.
Resize an Image (The screenshots will guide you through)
- In the images section of the Paint Menu click Resize
- There are 2 resizing options in Microsoft Paint. You have the option of resizing by pixels or by percentage (the default).
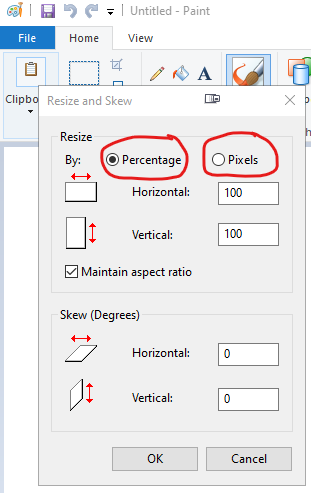
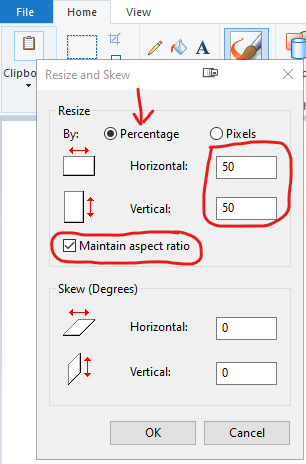
- Using the Percentage feature, change the Horizontal and Vertical % values to resize the image. The default value is 100. In this case, I want to reduce the image to half its current size. I’m going to set the Horizontal % to 50.
- When I enter 50 into the Horizontal field, 50 will also be displayed in the Vertical field because the Maintain aspect ratio checkbox is selected. Finally, click OK to save the new size.
Another fast and easy way to resize an image is to right-click on the Canvas area and choose to resize.
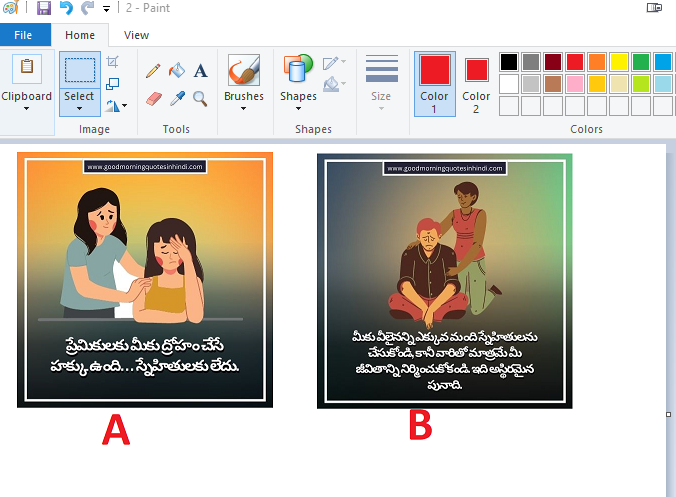
Crop an Image
The following steps below will guide you to cropping your very first image in Paint. So don’t go anywhere.
What is Cropping? Cropping simply means removing part of a photograph or other image to fit a given space or produce a better picture.
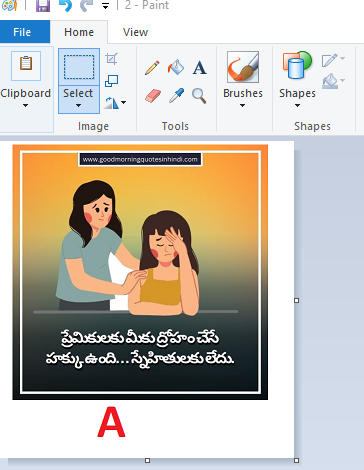
- On my canvas, we have two images A and B. I am going to crop out B while keeping A. To achieve this…
- Click the Select drop-down on the image area to choose the selection type.
- On the drop-down menu, we have Rectangular Select and Free Form Select.
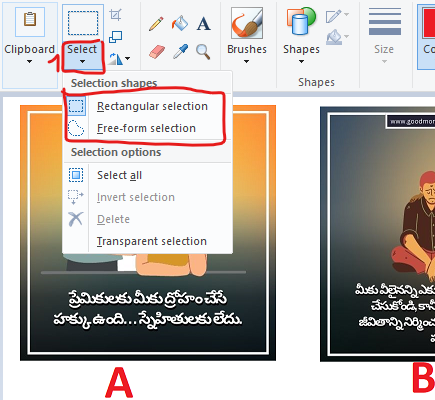
- In this case, I will go for Rectangular Selection, since my images are in a square form.
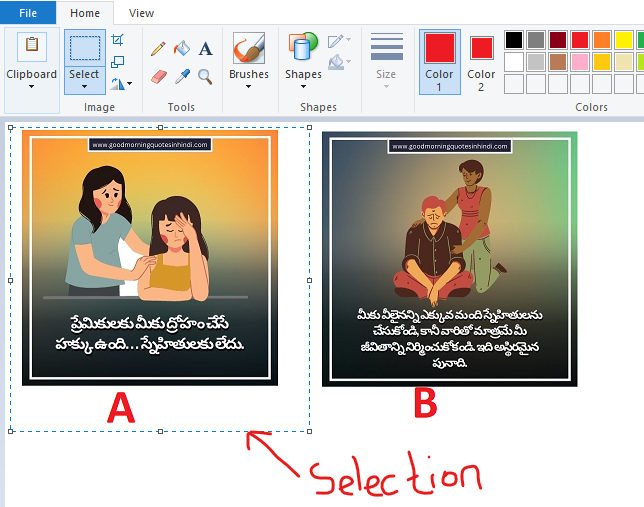
- With the selection tool active, click and highlight the image you wish to keep in this case we are keeping A (See screenshot below)
- To crop, simply right-click on the selected image and click on Crop or you can choose to click the Crop icon in the image area as demonstrated in the image below.
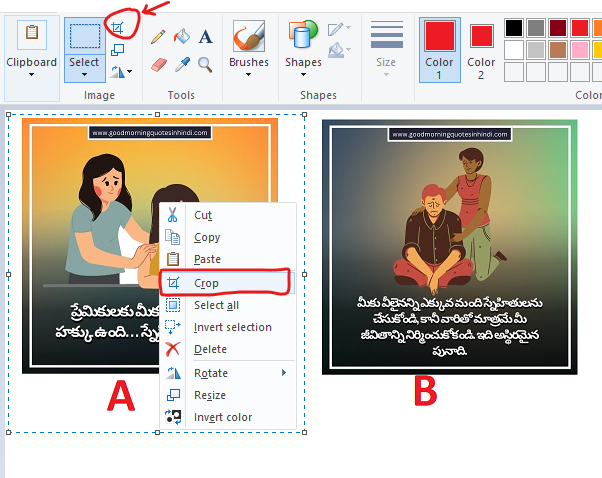
- The image below shows the image I wanted to retain after clicking on Crop
Hope this demonstration on how to crop an image in paint was helpful. Let us know in the comments section your valuable opinion.
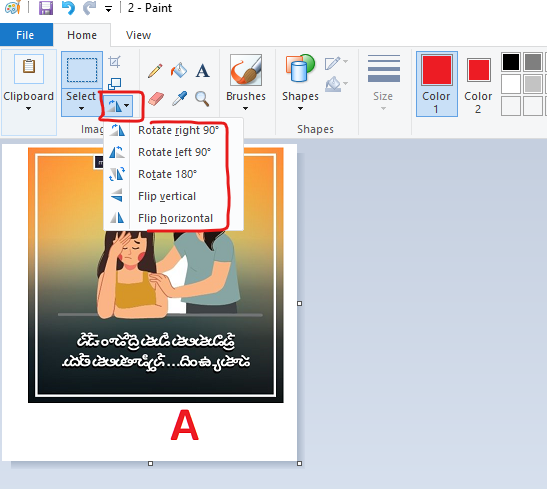
Rotate an Image
In order to rotate an image in MS Paint, here is what you need to do.
- Navigate your mouse cursor to the Image area where you have Resize, Crop, and Select. The other tool is the Rotate drop-down menu
- Click on the Rotate drop-down menu and choose any angle rotation of your choice depending on the project you are currently working on.
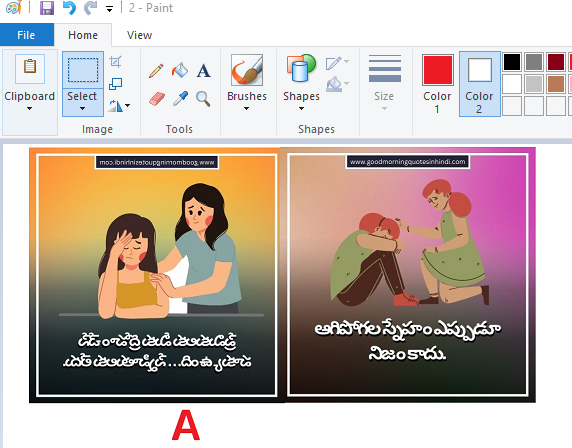
3. How To Merge Images in Microsoft Paint
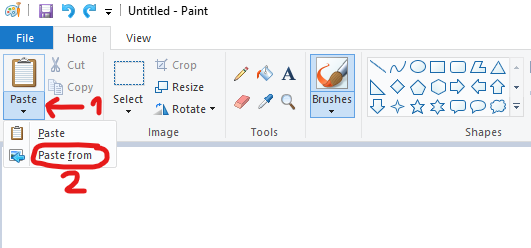
- To import the first image into the canvas area, navigate to the Clipboard area and click the drop-down arrow pointing downwards.
- On the Paste section, click the drop-down arrow and select Paste from.
- This opens up file explorer where you can navigate and choose an image of your choice.
- Repeat the above steps to import the second image. With the picture currently selected, click on it and hold, then move it to the area where you wish to place the image.
And finally, you can save the image by going to File > Save or you can Press Ctrl+A to select the Canva Image and then Press Ctrl+C to copy the merged image and paste (Ctrl+V) it on a word doc or webpage like I just did here.

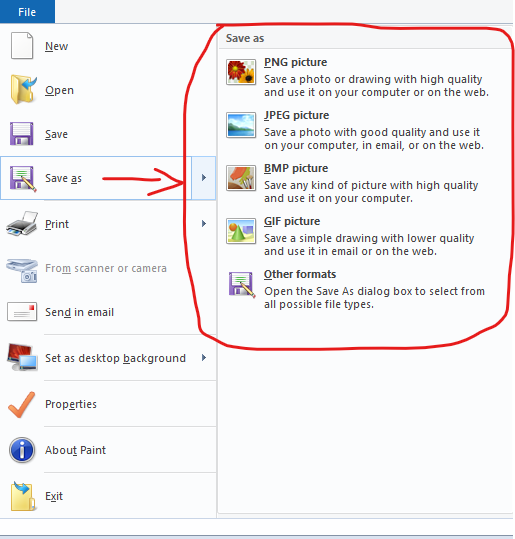
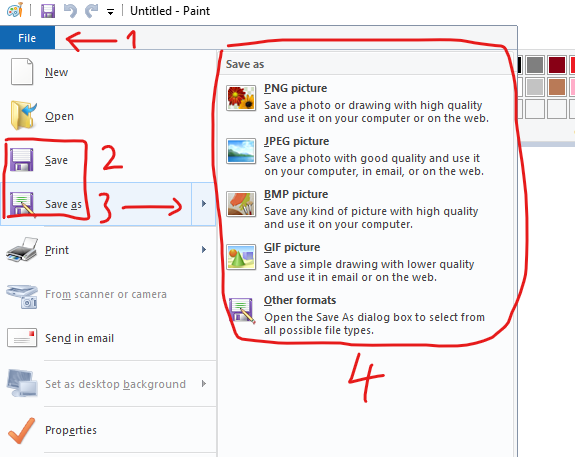
4. How To Convert Images in Paint
Did you know you could convert images to various file formats in the Paints App? Let me work you through it.
- Open an image you want to convert in MS Paint.
- Now select “File” from the menu in the top bar.
- Then, when you place your mouse cursor over the “Save as” option, you will see five options, some of which include different image formats.
- When given the option to save and convert the image, you can choose any of your preferred formats.
5. How To Add and Customize Texts to Your Image
Here is how you can add and customize texts on any image in Paint
How To Add Text
- Open MS Paint and the picture you wish to text-add.
- Next, select the “Text” tool from the top menu bar (looks like an “A”).
- Using the mouse cursor, click on the image area where you wish to add text.
- You can drag to enlarge or minimize the text box. Additionally, you can drag and drop the text box to reposition it on the picture.
How To Customize Text
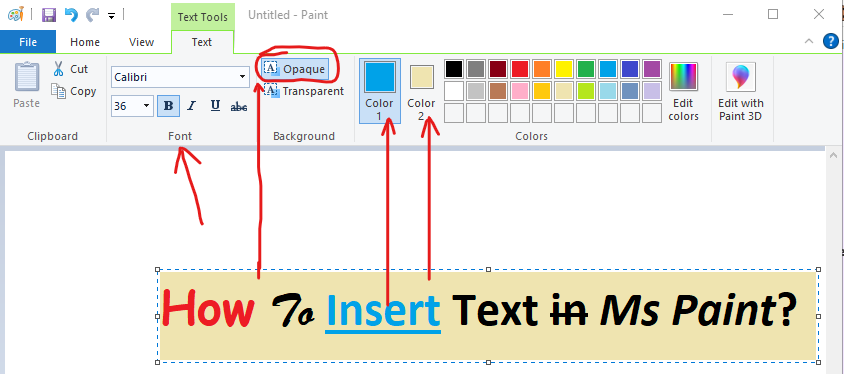
In addition to adding text to an image, you can edit the text to your preferences. Here are some few bullet points for personalizing the text in Microsoft Paint.
Note: The only drawback with Text Editing in Paint is that after you are done with your text design and you click out of the text editing box, you can’t go back to edit it.
- From the “Font” tab, you can alter the font and font size.
- Additionally, the text can be formatted in bold, italic, underlined, and strike-through.
- Additionally, you can modify the text’s background. You have the option of keeping the background transparent or changing it to “Opaque.” as in the screenshot above.
- You can alter both the text and background colors at once. The text color in this example is “Color 1,” and the background color is “Color 2.” (view screenshot above)
If you wish to get the best out of editing and customizing text in paint, please play around with the different editing tools and see how they work.
6. How To Skew Images in MS Paint
We’ll demonstrate how to skew images in Microsoft Paint in this tutorial. Skewing rotates an image around its vertical and horizontal axes, giving the impression that it is not in the centre. This can be applied to give an image a more delightful or lively appearance or a more dramatic effect.
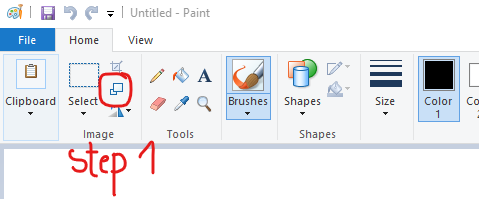
- Follow the steps we used to resize an image to open the pop-up window for resizing and skewing. The screenshot above indicates the resize and skew icon (Ctrl + W to open the resize & skew window)
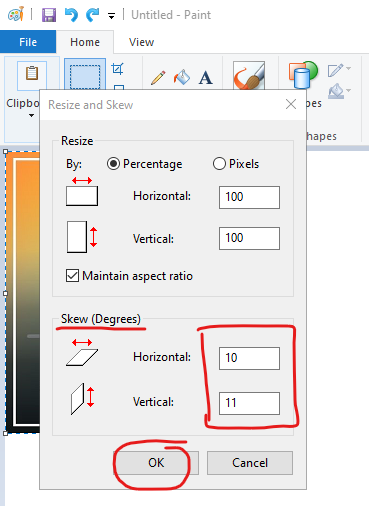
- At the resize and skew area, enter the vertical and horizontal values you would love to skew your image and click on OK once you are done. (The screenshots below will guide you)
7. How To Blur Any Part of The Image With MS Paint
In MS Paint there is no tool available for blurring an image but I’m going to share with you a cool tip on how to do that.
- Insert an image into paint using any of the methods we used above.
- Hover your mouse cursor and click on brushes (do not open the drop-down box)
- Then move your cursor to the image area and click on select (rectangular select)
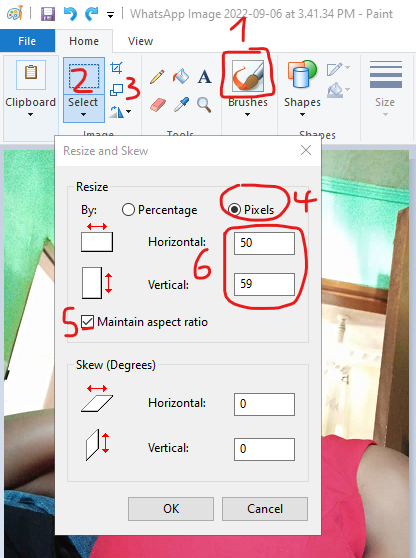
- Select the area you wish to blur in the picture and click on the Resize and Skew icon (select resize by pixels)
- By default, the Maintain aspect ratio area is checked so keep it that way. (make sure to write down the original Horizontal and Vertical values picked up from your selection) In my case, I have 249 by 297 as shown below.
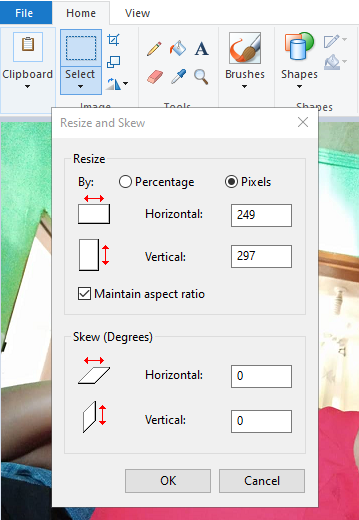
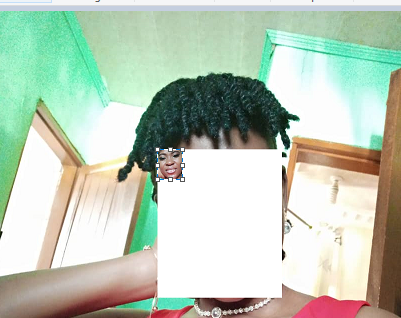
- In the Horizontal and Vertical areas, enter a much smaller value to shrink the selected area then click the OK as shown below.
- Below is the result of the resized selection.
- Click on the resize icon and enter the original values of the selection you wrote down while unchecking the Maintain aspect ratio box.
- Click on ok once you are done and you have a blurred area of your selection.

If you wish to learn how to blur text in Paint as well, let me know in the comments section.
8. How To Print An Image With Paint on Windows
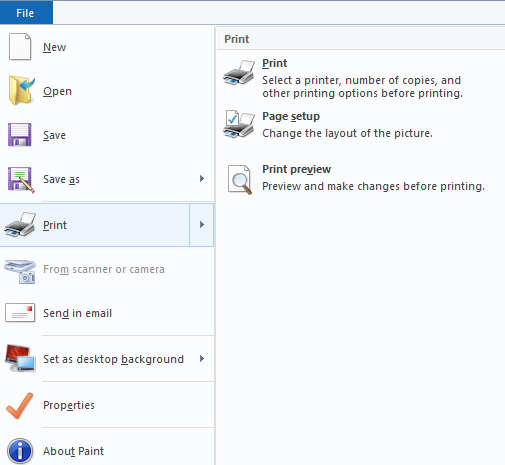
If you want to print an image in MS Paint, follow these simple steps:
- Open the image you want to print in MS Paint.
- Click the File menu and select Print.
- In the Print window that appears, select the Page Setup option and choose the Print to File option.
9. How To Save Images In Paint App Windows 10
After you are done with your project the next thing is to save it. The steps below will guide you to saving your very first project on MS Paint. Before you save your first project, I would love you to take note of these.
On the popup save window, you have two options either to Save the project as it is or to Save As using a particular file name (PNG, JPEG, BMP, GIF, or Other Formats). This helps you determine what file type you would love to save your project.
- To access the save window, navigate your mouse curse to the File menu and click on it.
- On the display popup window, navigate to Save or Save As and then choose a file format that best describes your project.
Part 5: Learn How To Draw in Paint – Help With Paint In Windows 10
1. Drawing and Erasing in MS Paint
In this section, we are going to focus more on the tools bar in relation to the colors section. You will learn how to use the Pencil, Brush, Feel a section with color, Eraser, and the Color Picker.
Selecting a Primary Color in MS Paint.
- To select a primary color, navigate your mouse cursor to the colors section and click on Color 1 (The primary color is the color you will use when using the Left Mouse Button on the Canvas).
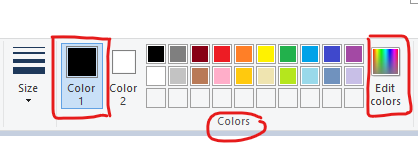
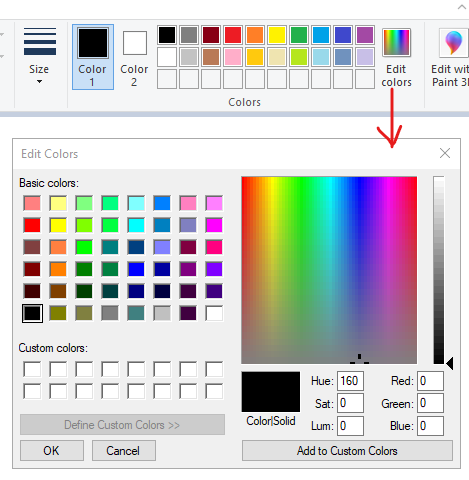
- If you do not have a color in the color palette area that matches your project, simply navigate and click on Edit Colors and customize a color of your choice.
Selecting a Secondary Color in MS Paint.
- To select a Secondary Color (used as the background color), click on Color 2 and choose the color you want in the color palette area.
- To use this color on any project, right-click your mouse on the area (Canvas) you want to place the color.
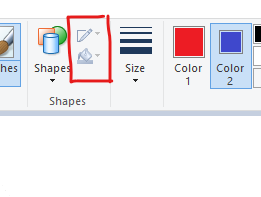
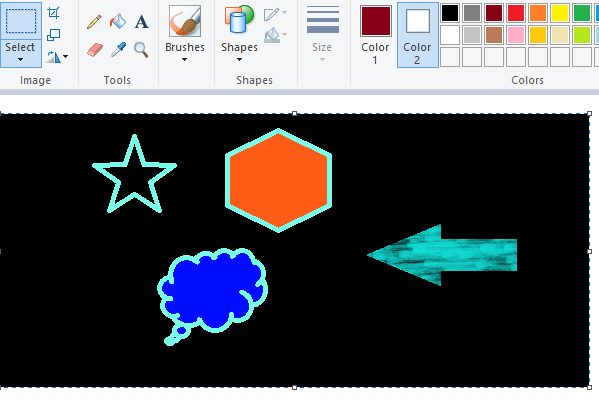
2. Creating a Shape in MS Paint
The steps below will help you create different shapes, increase line outlines, and learn how to use the Fill icon.
- Move your mouse to the Shapes area and click on the little Arrow pointing downwards. (This opens up the shape drop-down box)
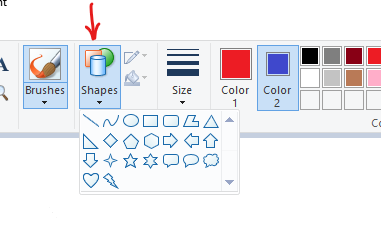
- Note that the shape outline and the Fill icon are graded out. That’s because you have not yet selected any Shape. But once a shape is selected, they become active.
- Click on any shape of your choice > click Shape Outline > Solid Color
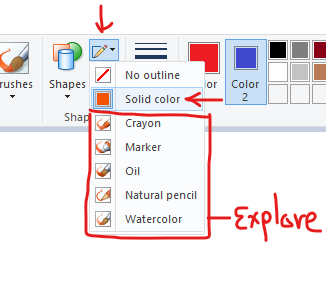
- With the solid color activated, your outline shape will be visible but if you select No Outline, the shape’s outline won’t be visible. But your shape will be visible as long as the Fill Solid Color is active.
- To draw the shape, click on the Canvas and hold, move the mouse cursor to draw your shape. (Press shift and hold if you wish to obtain a uniform shape e.g circle, square)
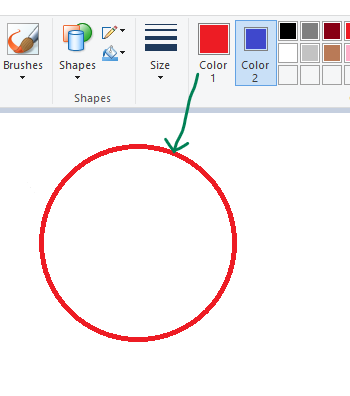
- To add a Filled background in the shape, go to Shape Fill and click on solid color and notice the color in Color 2 appears in your shape.

- Note that if you don’t need an outline, you can simply go to the Outline icon and click No Outline
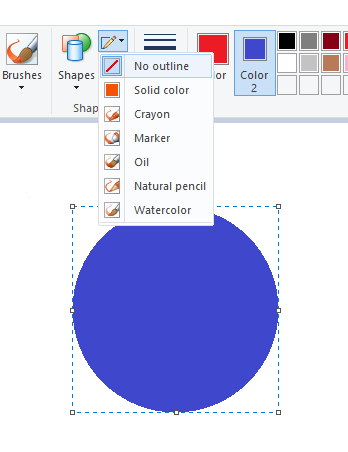
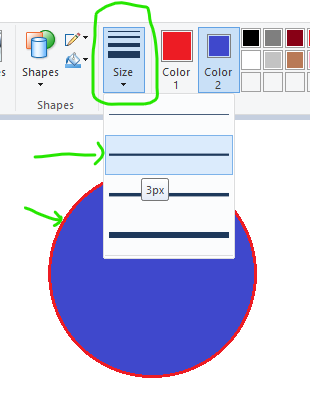
- To increase or decrease the outline size, simply go to Size and choose a line thickness of your choice.
Hope this was helpful but if you still have any doubts, please let us know in the comments section.
3. Adding Text in MS Paint
Visit Part 4 of Help With Paint in Windows 10 Tutorial for more details on how to Add and Customise text in MS Paint.
4. Undo and Redo
Many users might not be aware that MS Paint has an undo and redo feature. Therefore, if you make a mistake while using MS Paint to edit images, you can go back using the undo/redo button by navigating to the undo button or use the shortcut “CTRL+Z” keys on your keyboard whenever you need to undo.
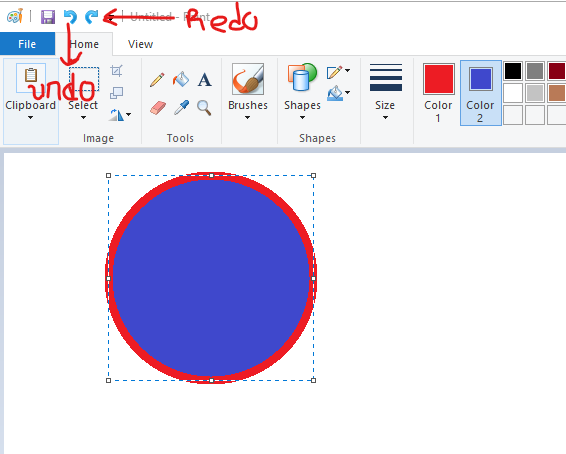
And to redo, Simply press the “CTRL+Y” keyboard shortcuts or navigate to the redo button on the Paint App.
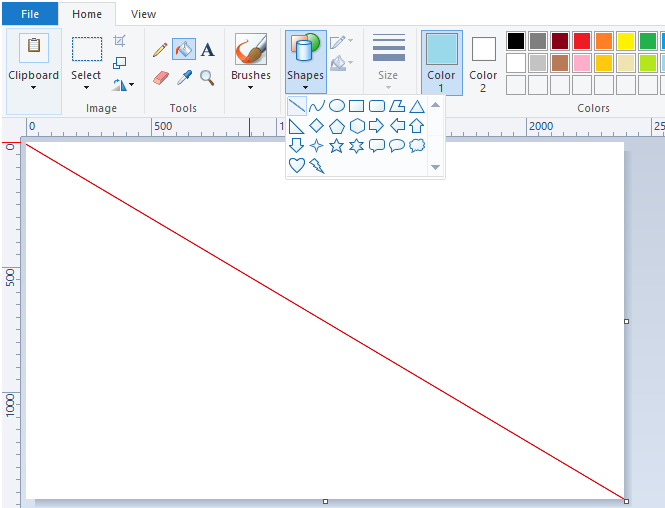
5. Create a Gradient Color Effect in Paint
In order to create a gradient color effect, here are the steps to follow.
- Open the paint App
- Resize your canvas to the desired size.
- Go to shapes > select the line shape > On your Canvas, draw a diagonal line separating the Canvas equally.
- Go to the tools section and select Fill with color icon (Paint container) > choose the desired color and click on one part of the separated Canvas.
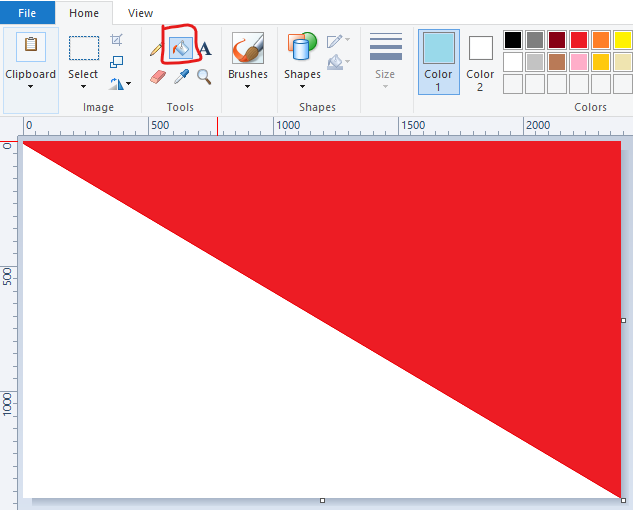
- Repeat the step above and choose another color and click on the other part of the canvas.
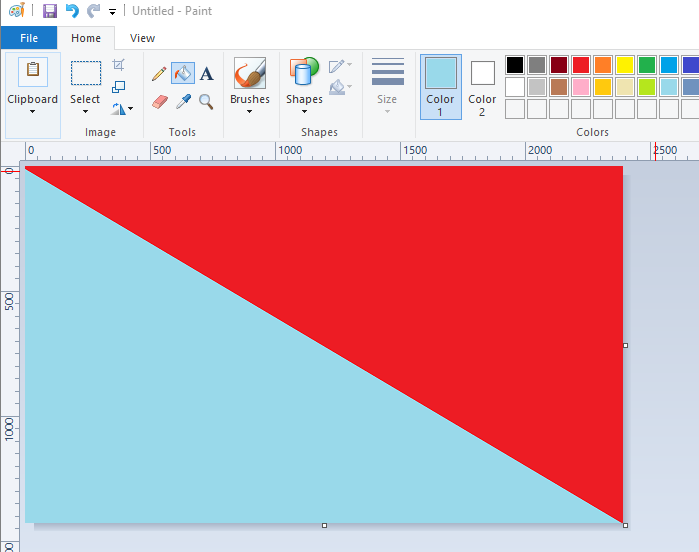
- Go to resize > select Pixel > Uncheck the Maintain Aspect Ratio > change the horizontal value to 1 and click Ok.
- Repeat the previous step and choose a greater than or equal value(the value you initially changed to 1) in the horizontal section and click Ok when done.
- And you have your gradient effect.

Sorry that guys for changing my gradient colors. The other color combination didn’t turn out well so I decided to go for the Red and Yellow colors. But I hope you now know how to create a gradient color effect with MS Paint.
6. Increasing Brush Size
The brushes in MS Paint can be used to edit or paint any image. The steps below will help you open up the brush window.
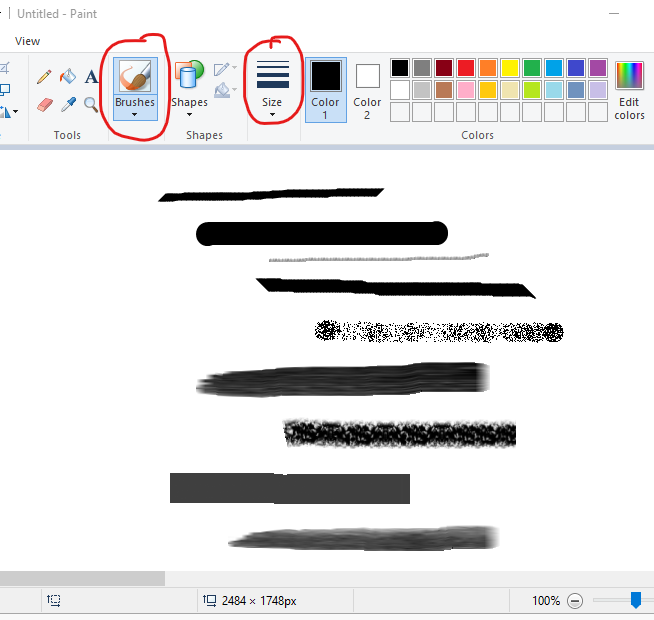
- The ‘Brushes‘ icon can be found in the top menu bar; click on it to get started.
- Once you click it, several brushes will show up as a result so you can choose from them.
- To use the brushes, you will now need to draw on the image with your mouse.
- The brushes’ sizes can also be adjusted. Simply select your preferred brush size from the top bar’s “Size” icon to accomplish this.
- In addition to that, a keyboard shortcut is available for changing the brush size.
- Press and hold the CTRL key while pressing the Plus key on the Numpad of your keyboard to increase the brush size.
- As an alternative, you can reduce the brush size by holding down the CTRL key while also pressing the “Minus” key on your keyboard’s Numpad.
7. Transparent Background Selection
To create a transparent Background selection, simply follow the steps below.
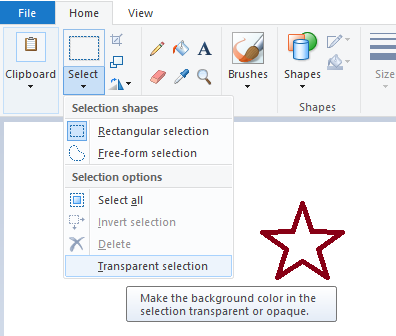
- Navigate your mouse to the Image Tools Bar after you must have opened your Paint App.
- On the Select icon, Click the small arrow to open the drop-down menu.
- Move your mouse towards the end of the drop-down menu and click on Transparent Selection.
- Once clicked, the transparent selection is activated. You can deselect by following the steps above and clicking on the Transparent Selection icon.
8. Create Custom Brushes
In this section, you will learn how to create a custom brush from any brush shape that you have created with the help of the brush tool.
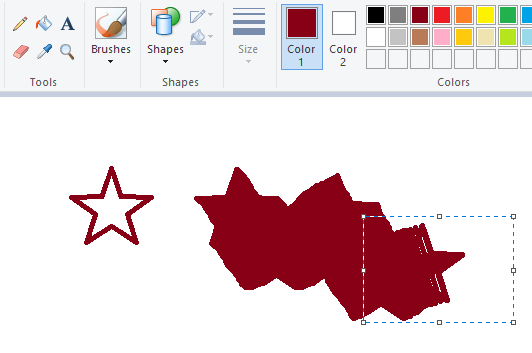
- Draw the outline of your custom brush using any brush from the “Brushes” menu.
- Select the shape of your brush with the help of the selection tool. But before you select your custom brush, make sure you turn on Transparent Selection.
- After selecting your newly created custom brush, press and hold the shield key on your keyboard.
- Then click and hold your selection and draw by moving the mouse around.
- Note that each time you want to use the custom brush, you must select it first > press and hold down the shift key before clicking on your selection to draw.
Note: You can also create custom brushes using Shapes. The above steps are applied but have it in my that you have to select and draw a shape before customizing it as your local brush.
9. Inverting Colors In Microsoft Paint
You are going to learn how to invert color in Windows 10 using the Microsoft Paint App.
- Open Microsoft Paint App by following the steps in Part 1 of this tutorial.
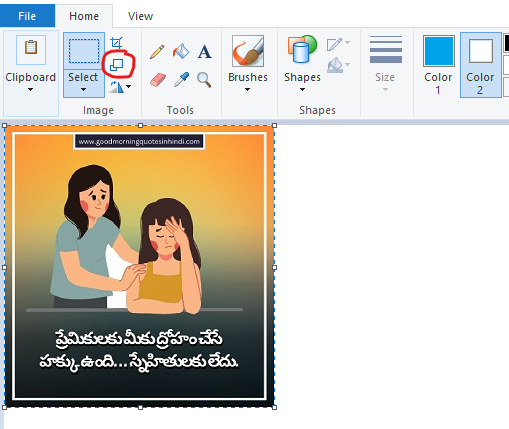
- You can create some shapes or import the image you wish to color invert as shown in the screenshot below.
- With the help of the selection tool, click on Select All (Ctrl + A)
- After your selection, right-click on your Canvas and choose Invert Color.
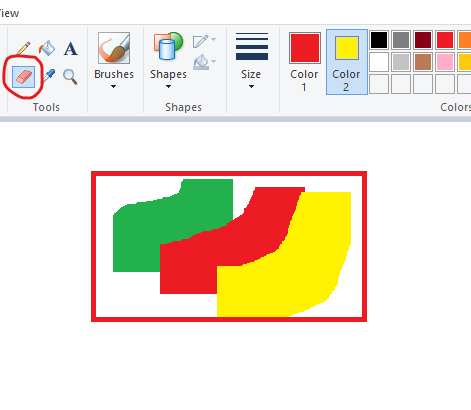
10. Using Eraser As a Color Replacement Tool
In order to use the eraser as a color replacement tool, follow the following steps.
- I will draw a shape on my Canvas so I can do the demonstration easily.
- My shape has an outline but no fill. I am going to use the Eraser to Fill or Paint it with any color of my choice.
- Select your desired color using Color 1 (foreground color) and Color 2 (background color).
- Then click on your Eraser tool. Click and hold it over the image and move it to paint.
- You can also replace a color with the eraser tool. All you need do is choose a background color of your choice and use the Eraser to paint over it.
11. Learn How To Trace a Pic in MS Paint
Follow the steps below.

- Open the image you want to trace.
- From the colour swatch select black whilst choosing Color 1.
- Outline your image with the help of the pencil tool.
- After you are done outlining, press Ctrl+A to select the entire Image. Right-click on Canvas and select Invert Color.
- Next, navigate to File > Properties > Balck and White then Click OK
- Again select the image by pressing Ctrl+A on your keyboard. Right-click on the image and select Invert Color.
- To clean up the messy parts of your image, use the Eraser tool.

12. Deleting Objects in MS Paint
Steps to follow;
- Using the selection tool, select the object you want to delete. (Please note that we have previously described how to select an image or objects using the selection tool).
- Right-click on your selection and click on delete. You can as well press the delete key on your keyboard to delete the selected object.
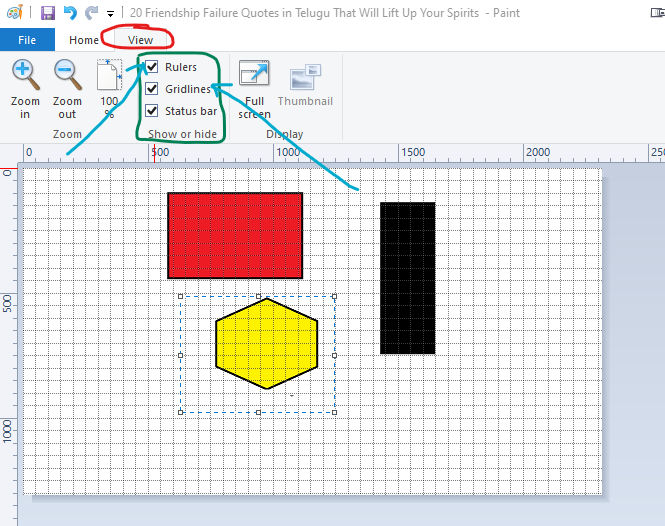
13. Bring out the Rulers and Gridlines
To bring out the ruler guides and gridlines, follow the steps below.
- Navigate to and click on the View tab.
- While on the view tab, you have the Zoom, Show or Hide and Displace sections. (Our focus here is in the Show or Hide section)
- Check the boxes (Rulers/Gridlines) to turn them on as shown in the screenshot below.
14. Take and Edit Screenshot Using MS Paint
Steps to Follow;
- Use the Snipping Tool or Snip and Sketch App on Windows 10 to take a screenshot of your active window. Alternatively, locate and use the Prt Sc (Print Screen) key on your keyboard (Simply press the key to take a screenshot of your active window).
- Then open MS Paint and press Ctrl+V to paste in the Canvas area.
- With all the editing tools available at your disposal in Paint, you can do whateverEdit you wish to do on your screen.
At this stage of the tutorial on how to get help with paint in windows 10, we believe you are gradually becoming an expert in using the Paint App if you did practice well all the areas thought in this Paint guide.
15. Print with MS Paint
To print a project in MS Paint, these steps will guide you.
- Navigate to and click to open the File tab
- Move your mouse to print and select how you wish to print
- To see a screen short demonstration, navigate to Part 4 of this tutorial titled Working with Images in Paint. You have everything in detail.
16. Create PDF Files from MS Paint
This is one cool feature available in MS Paint that will wow a lot of people. In order to save your project in PDF format in Microsoft Paint, these steps will guide you.
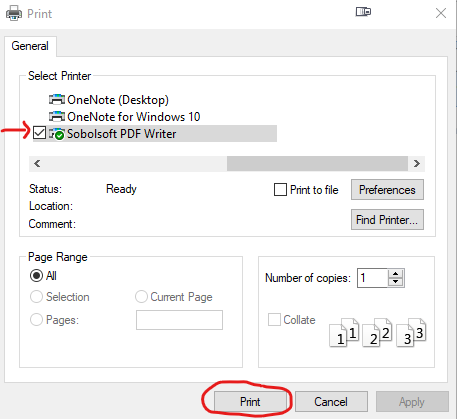
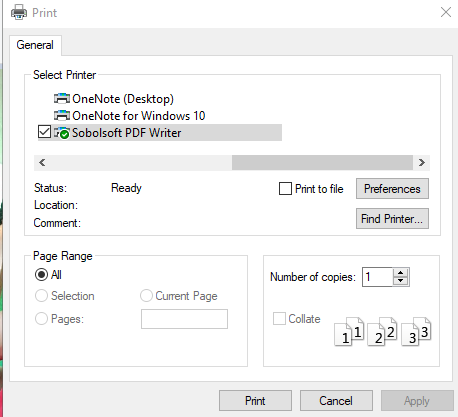
- After you are done with your project, navigate to File > Print
- Then select the Print option from the display menu.
- A popup menu will appear after clicking on Print. Check the Sobolsoft PDF Writer option under OneNote for Windows 10 by clicking in the box.
- Click on Print after your selection to save the project in your preferred location
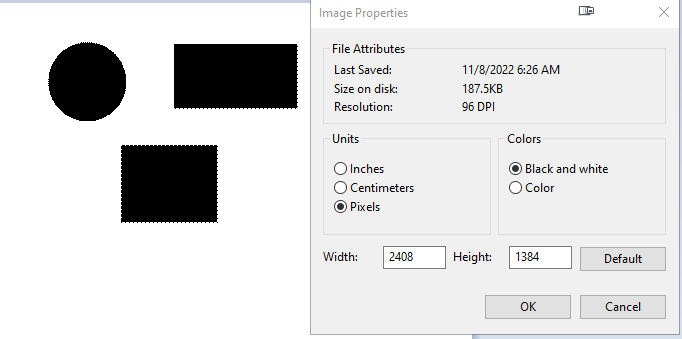
17. Convert to Black and White Image
Steps to follow;
- Navigate to File > Properties
- After clicking on properties, an Image Properties window will pop up.
- Navigate to the Color section > select Black and White then click on Ok and you are done.
19. How To Set Image As Desktop Background in MS Paint
Part 6: Windows Paint Keyboard Shortcuts – Help With Paint In Windows 10
| S/N | Keyboard Shortcut | Functions of These Keywords |
|---|---|---|
| 1 | Alt + V | Displays the Paint View Tab |
| 2 | Alt + H | Displays the Home View Tab |
| 3 | Alt + F4 | Closes The MS Paint App |
| 4 | Alt + F | Opens Paint File menu |
| 5 | Ctrl +W | The Resize and Skew settings window is displayed |
| 6 | Ctrl + N | Closes the active image and opens a fresh, blank canvas |
| 7 | Ctrl + O | Opens the Paint Open window so you can import an image into Paint Canvas |
| 8 | Ctrl + S | Changes made in your active project are saved. |
| 9 | Ctrl + R | Shows or Hide the Ruler guides |
| 10 | Ctrl + P | Opens the Print dialog box |
| 11 | Ctrl + G | Adds or removes the Gridlines |
| 12 | Ctrl + E | Displays the Image Properties |
| 13 | Ctrl + Z | Undo the last action |
| 14 | Ctrl +A | The Entire Canvas is Selected |
| 15 | Ctrl + C | Helps Copy a selected area |
| 16 | Ctrl + V | Paste a copied item from Clipboard whether copied in or outside Paint |
| 17 | Ctrl + Page Up | Zoom In. Similar to Ctrl and Mouse scroll up |
| 18 | Ctrl + Page Down | Zoom Out. Similar to Ctrl and Mouse scroll Down |
| 19 | Ctrl + U | Underline selected text |
| 20 | Ctrl + B | Bold selected text |
| 21 | Ctrl + I | Italicize selected text |
| 22 | Delete key | Delete a selection |
| 23 | Esc key | Cancel existing selection |
| 24 | F1 or Fn + F1 key | Opens search results for “help with paint in windows 10” on Bing.com |
| 25 | F11 or Fn + F11 key | View the image in Full-Screen mode |
| 26 | F12 or Fn + F1 key | Opens the Save As dialogue |
Part 7: Bonus On Help With Paint In Windows 10
In this section, I’m going to share with you how to set your project directly in Paint as a desktop background. Excited about it? Follow the steps below.
- Once you are done with your project, simply navigate to File > Set as desktop background > then select any of the options (Fill, Tile or Center).
- The Fill, Tile and Center appear differently on your desktop so test them and choose the one you deem it fit.
Summing Up Help With Paint In Windows 10
That’s it guys on how to use Microsoft Paint for beginners step-by-step! If you did go through this Windows 10 Paint User Guide thoroughly, then by now you should be able to open the paint app, insert images, create decent designs, resize images, create amazing gradient effects, delete objects and the list goes on and on.
With this tool, you can create amazing designs and projects and the beautiful thing is, it’s free and not even complicated like the other expensive graphic design apps.
So, if this article was helpful, please support our growth by sharing and don’t forget to share with us your valuable view on this post. Until we meet again… Cheers!!!


Wow, wonderful weblog format! How lengthy have you been blogging for?
you made running a blog look easy. The full glance of your website is fantastic, let alone the
content! You can see similar: ecommerce and here najlepszy sklep
Aw, this was an exceptionally good post. Finding the time
and actual effort to generate a superb article… but what
can I say… I put things off a lot and never seem to get nearly anything
done. I saw similar here: sklep and also here: najlepszy sklep
Highly descriptive blog, I enjoyed that a lot. Will there be a
part 2? I saw similar here: ecommerce and also here: najlepszy sklep